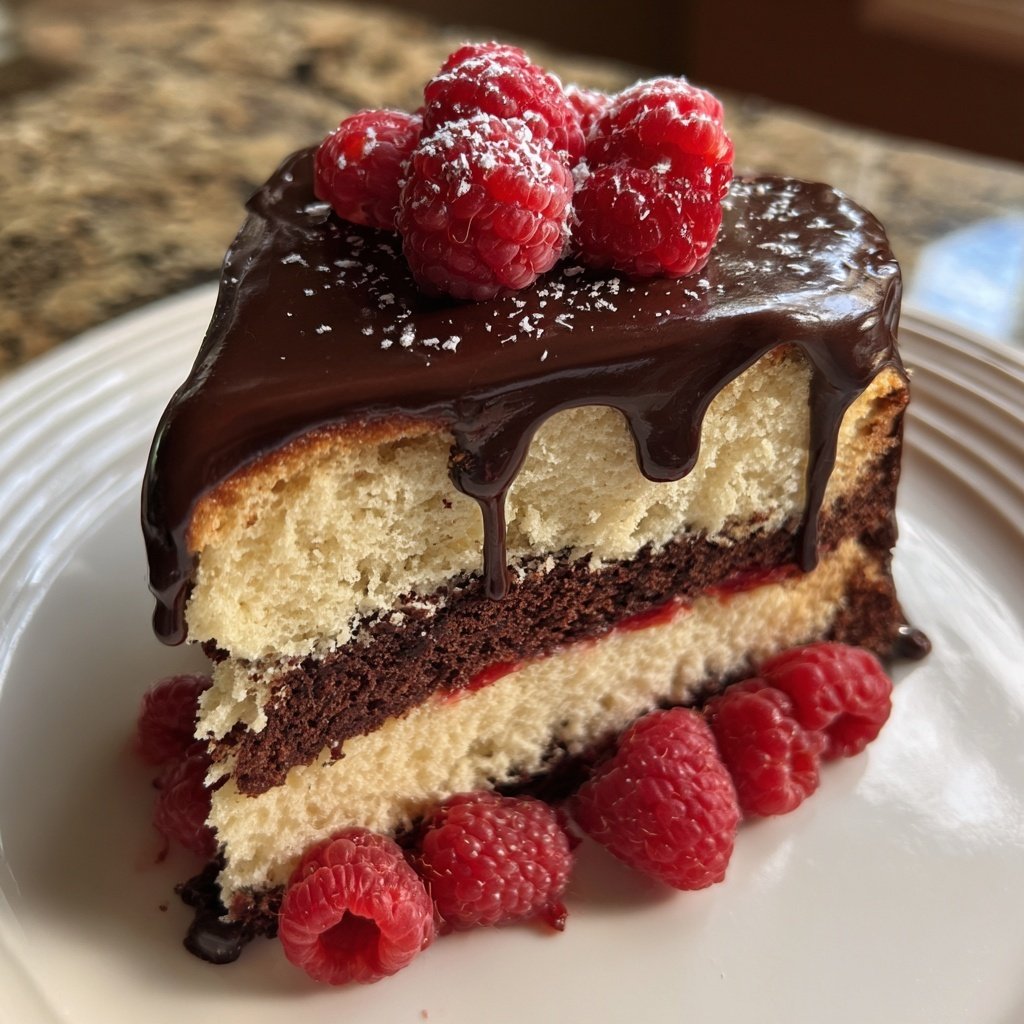
Mini Heart Cake with Chocolate Sponge
Highlighted under: Soft Collection
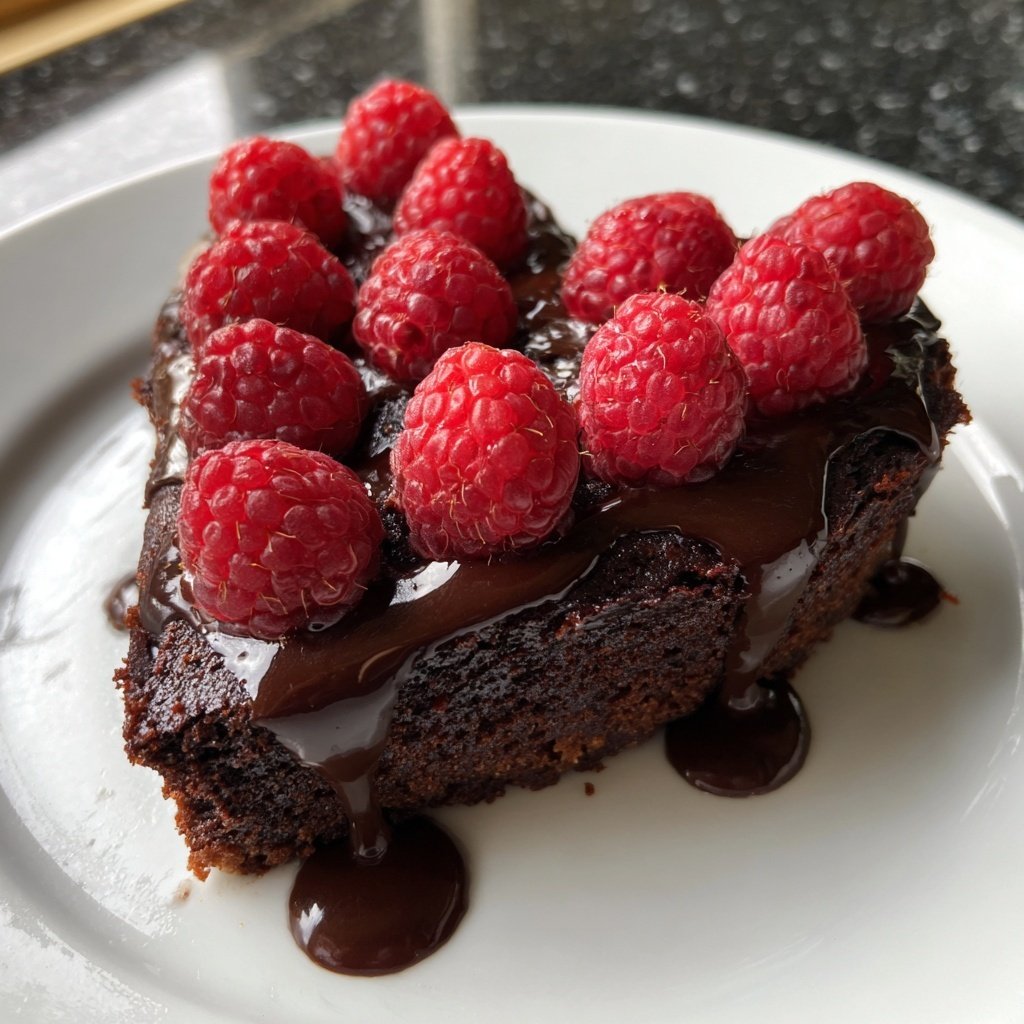
I absolutely love making this Mini Heart Cake with Chocolate Sponge for special occasions. The combination of light, fluffy chocolate sponge and the delicate heart shape makes it a perfect dessert for celebrating love. The best part is how versatile it can be; whether you top it with fresh berries, chocolate ganache, or whipped cream, it always impresses. Plus, the process of baking these cute little cakes brings back wonderful memories of baking with my family, making it not just a treat, but a heartwarming experience as well.
When I first created this Mini Heart Cake with Chocolate Sponge, I wanted something that not only tasted great but also brought a smile to everyone’s face. The lightness of the sponge cake truly stands out, and incorporating cocoa into the mix gives it that rich, chocolate flavor that's hard to resist. I took my inspiration from classic sponge cakes and added just the right amount of baking powder to keep it fluffy and light.
One of the best tips I can share is to beat the egg whites separately before folding them into the batter. This method creates that signature airy texture we all love in a good cake. It’s not too complicated, but it makes a world of difference in the final product. Trust me, it’s worth the extra step for that perfect bite!
Why You'll Love This Cake
- Cute heart shape perfect for romantic occasions
- Deliciously moist chocolate sponge that melts in your mouth
- Versatile with any frosting or toppings you desire
Understanding the Ingredients
The success of this Mini Heart Cake largely hinges on the technical role of the cocoa powder. Be sure to use unsweetened cocoa powder for a rich chocolate flavor without the added sugar. Alternatively, Dutch-processed cocoa can provide a deeper, more complex taste; just keep in mind it may affect the leavening since it reacts differently with baking soda compared to natural cocoa powders.
Butter is another crucial ingredient, contributing to the cake’s moistness and flavor. I recommend using unsalted butter so you can control the overall saltiness in your cake. If you're looking for a dairy-free option, coconut oil or a vegan butter substitute will work well, but make sure it's softened to cream easily with the sugar.
Eggs serve as a binding agent, giving the cake structure and stability. If you're looking to make this cake egg-free, consider using flaxseed meal mixed with water (1 tablespoon ground flaxseed mixed with 3 tablespoons water equals one egg) or unsweetened applesauce for a moisture boost.
Perfecting the Baking Process
When baking the cakes, it's essential to keep an eye on them as ovens can vary greatly in temperature accuracy. Set your timer for the minimum baking time of 25 minutes, but check for doneness by inserting a toothpick into the center; it should come out clean or with just a few moist crumbs attached. If you notice uneven doming, rotate the pans halfway through baking for a more uniform rise.
Cooling the cakes completely is vital before frosting. If you try to frost while warm, the frosting will melt and slide off, ruining the presentation. I usually place my cakes on a wire rack for about 15-20 minutes before transferring them to the fridge for a quicker cool-down, which solidifies them for easier handling.
When it comes to frosting, use well-chilled heavy cream to achieve a light, fluffy texture. Whip until soft peaks form, adding sugar gradually to ensure it dissolves completely. For added flavor, incorporate a bit of melted chocolate or espresso powder into the whipped cream for an extra kick.
Ingredients
For the Cake
- 1 cup all-purpose flour
- 1/2 cup cocoa powder
- 1 tsp baking powder
- 1/4 tsp salt
- 3/4 cup sugar
- 1/2 cup unsalted butter, softened
- 2 large eggs
- 1 tsp vanilla extract
- 1/2 cup milk
For Frosting (optional)
- 1 cup heavy cream
- 2 tbsp sugar
- 1 tsp vanilla extract
- Fresh berries for decoration
Instructions
Preheat and Prepare
Preheat your oven to 350°F (175°C) and grease the heart-shaped cake pans.
Mix Dry Ingredients
In a bowl, sift together the flour, cocoa powder, baking powder, and salt. Set aside.
Cream Butter and Sugar
In a separate bowl, cream the softened butter and sugar until light and fluffy. This should take about 5 minutes.
Add Eggs and Vanilla
Beat in the eggs one at a time, mixing well after each addition, then add the vanilla extract.
Combine Mixtures
Gradually add the dry ingredients to the butter mixture, alternating with milk until well combined.
Bake the Cakes
Pour the batter evenly into the prepared heart pans and bake for 25 minutes or until a toothpick comes out clean.
Cool and Frost
Allow the cakes to cool completely before frosting with whipped cream and topping with fresh berries.
Pro Tips
- For an extra chocolate kick, you can add chocolate chips to the batter before baking.
Storing and Serving Tips
Store your Mini Heart Cakes in an airtight container at room temperature for up to two days, or in the fridge for about four days. If you need to keep them longer, consider freezing the unfrosted cakes. Wrap them tightly in plastic wrap and foil to prevent freezer burn, and they'll keep well for up to three months. Thaw them at room temperature before frosting for the best texture.
For serving ideas, try garnishing with a dollop of whipped cream and a selection of fresh berries like strawberries or raspberries for a delightful contrast of flavors and vibrant colors. A dusting of powdered sugar can also add a beautiful finishing touch, enhancing the heart shape while keeping the presentation elegant yet simple.
Creative Variations
Feel free to experiment with different flavor profiles by swapping the cocoa for spices like cinnamon or pumpkin spice during the fall. You can even mix in mini chocolate chips to the batter for added texture. If you want a healthier twist, substitute half of the all-purpose flour with whole wheat flour or almond flour for a nutty flavor and denser texture.
For the frosting, consider experimenting with flavor infusions. Adding a splash of almond extract or orange zest can create a unique twist. If you're feeling adventurous, a layer of fruit preserves between the cake layers can introduce a delightful fruitiness that balances the richness of the chocolate sponge.
Questions About Recipes
→ Can I make this cake in advance?
Yes, you can bake the cakes in advance and store them in the refrigerator for up to 2 days before frosting.
→ What can I substitute for eggs?
You can use flaxseed meal mixed with water or commercial egg replacers.
→ How do I store leftovers?
Store leftover cake in an airtight container in the refrigerator for 3-4 days.
→ Can I freeze the cake?
Yes, you can freeze the unfrosted cakes. Wrap them tightly in plastic wrap and place them in a freezer bag.
Mini Heart Cake with Chocolate Sponge
Created by: Briony Ashcroft
Recipe Type: Soft Collection
Skill Level: Intermediate
Final Quantity: 4 servings
What You'll Need
For the Cake
- 1 cup all-purpose flour
- 1/2 cup cocoa powder
- 1 tsp baking powder
- 1/4 tsp salt
- 3/4 cup sugar
- 1/2 cup unsalted butter, softened
- 2 large eggs
- 1 tsp vanilla extract
- 1/2 cup milk
For Frosting (optional)
- 1 cup heavy cream
- 2 tbsp sugar
- 1 tsp vanilla extract
- Fresh berries for decoration
How-To Steps
Preheat your oven to 350°F (175°C) and grease the heart-shaped cake pans.
In a bowl, sift together the flour, cocoa powder, baking powder, and salt. Set aside.
In a separate bowl, cream the softened butter and sugar until light and fluffy. This should take about 5 minutes.
Beat in the eggs one at a time, mixing well after each addition, then add the vanilla extract.
Gradually add the dry ingredients to the butter mixture, alternating with milk until well combined.
Pour the batter evenly into the prepared heart pans and bake for 25 minutes or until a toothpick comes out clean.
Allow the cakes to cool completely before frosting with whipped cream and topping with fresh berries.
Extra Tips
- For an extra chocolate kick, you can add chocolate chips to the batter before baking.
Nutritional Breakdown (Per Serving)
- Calories: 320 kcal
- Total Fat: 18g
- Saturated Fat: 10g
- Cholesterol: 65mg
- Sodium: 150mg
- Total Carbohydrates: 34g
- Dietary Fiber: 2g
- Sugars: 22g
- Protein: 4g